Sunday, June 23, 2013

Week 26 Recipe: Mango Couscous Salad

Warning!  You need to like cilantro to enjoy this recipe. I've heard that for some people it tastes like soap; that's unfortunate, because I think it's wonderful. This recipe comes from the "Relish" insert that comes in your newspaper.  It was created by Jen Karetnick, an author and Miami food critic.


Couscous with mango and cilantro

Ingredients:
8 servings
2 cups of chicken broth
6 oz of couscous
2 cups of chopped mango
2 cups English cucumber chopped
2 T of olive oil, divided
1 cup chopped cilantro
2 T honey
Juice of one lime
Salt and pepper to taste

Bring the chicken broth to a boil and add the couscous. Cook for time recommended on box.  Note: If you aren't already using vegetable or chicken broth to cook all of your rices (yes, I know couscous is really a pasta)  then shame on you!  It adds so much flavor to both white and brown rice - way better than using water.

Remove from heat, fluff and stir in 1 T of olive oil to prevent from sticking.

While the couscous is cooling combine the other ingredients in a bowl.
Add the couscous and stir to combine.

This is one of those salads that just gets better with time. The dressing is very light, letting the mango and cilantro be the stars of the show.

Week 26 Craft: Faux Sea Glass Floats

I've been wanting to add some glass floats to my guest bath counter, but they are a bit pricey. So why not try making my own?  Inspiration came dorm this post for painting glass with colored glue.  Note: I tried linking to this tutorial, but the tutorial is no longer there - my apologies.

While that tutorial is for candlesticks I thought why not try globes?

What you need:
Clear glass ornaments (I bought large 4" ones at hobby lobby)
Craft glue
Food coloring
Paintbrush
Hemp cording

Instructions:
1.Take the end off the ornament


2.I wanted to trim the "mouth" off so it would truly bea globe, but my glass cutter wasn't deep enough to reach the neck.

3.Pour some craft glue into a plastic cup and mix in food coloring to get the shade of your choice. A little food color goes a long way, so use sparingly.

4.With your paintbrush carefully apply the glue to the outside of the ornament, covering it completely.

5.Carefully set the ornaments on newspaper to dry completely. This is where a round object might not work as well as a flat one. The glue dripped slightly as it dried.


6.It's pretty cool to watchtower the glass turn from opaque to a softly hued translucent.


7.Once the glue had completely dried it was time to add the netting.

8.Start by making a loop of hemp about the size of a quarter. Just take about a six inch length, loop right over left, and keep tucking the edges.  Wow, hopefully the picture makes more sense than that description!


9.Cut eight lengths of hemp that are 50" long. Attach them to the loop by folding each piece in half, laying the over the loop and pulling the ends through the "fold".


10.Tape the loop with the 16 (8 folded in half) lengths of cording to the top of the ornament.

11.Starting one inch from the top take the left side of one of the pairs of cording and the right side of the pair next to it and tie a square knot. Work your way around. Tape these knots to the ornament to hold them in place and repeat. Tape as you finish each row.


12.I found it took me about four rows to get to the neck of the ornament.
Here's a link to an illustration that shows how to do the knots.

13.I wanted to hide the neck as much as possible so it truly looked like a fishing float so I braided the hemp cording and formed a loop. Then I wrapped the cording tightly around the neck and tucked the ends in.


Voila!  My own sea glass fishing float for little more than a dollar each. This is one of those crafts that looks great on a shelf, but don't put it where people will want to hold and inspect them it's like that hgtv design show "the high low project" where it all looks great when you walk in the room, but up close you can tell its not quite quality. But hey, for $1 vs. $20 I'm pretty happy.

Week 25 Recipe: pepperoni toasts

Technically, this isn't a recipe, but I'm sharing it anyway. This was one of my favorite lunches growing up and I've been known to make it a time or two as an adult. My dad taught us how to make these. I'm not sure quite how describe it... Something of a cross between a grilled cheese sandwich and a pepperoni pizza; let's call them pepperoni crisps.

Ingredients
Slices of white bread
Slices of Kraft cheese
Slices of pepperoni

Turn your oven broiler on high.  Place your bread slices on a foil lined baking sheet.
Cover each piece of bread with a slice of cheese and then put four slices of pepperoni on each slice of cheese.

Place under the broiler and watch it get all bubbly. In my house they aren't done unless the cheese has formed an almost black crust.


The perfect pairing with this gourmet lunch is a nice grape Koolaid.

I know, I know - this cannot be healthy in any way. The grease from the pepperoni soaks nicely into the soft white bread. I make no apologies. This is a pure slice of my childhood heaven. Try it with your kids. They'll be thrilled that they get to create their own mini pepperoni pizza and watch it come to tasty, bubbly life in the oven.


Wednesday, June 12, 2013

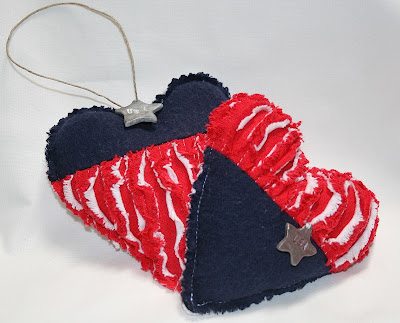
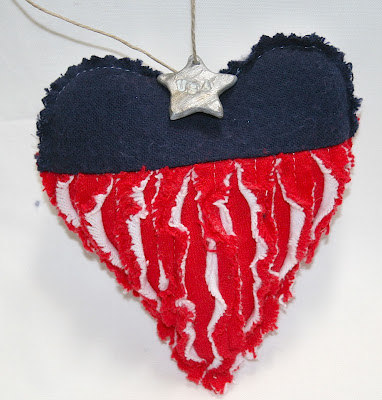
Week 25 Craft: Patriotic Chenille Heart

The 4th of July is nearly here and it's fun to tuck little hints of red white and blue throughout the house. Here are a few pictures of patriotic hearts that helped inspire this week's project.


I thought it  might be fun to incorporate chenille to highlight the "stripes" of the stars and stripes.  If you aren't familiar with how to make chenille you can learn about it here.


Come along and learn how to make these cuties.
What you need:
Blue felt
Red felt
White felt
Note: make sure you thoroughly wash your felt before you start.
Twine
Poly fiberfil
Sculpy clay (I used silver)
Craft paint
Embossing powder

1. Layer your white felt between two layers of red felt and sew together by following the chenille tutorial.  Stop after cutting the lines.  For this project I made the seams 1/2" apart instead to give a little more wave to the stripes.  

2.  Right sides together sew your blue felt to the layered and cut red/white felt.


3. On the right side of the sewn felt trace your heart pattern using sewing chalk.  Mine is 5" at its widest part.  You can turn your heart upside down to get more mileage out of your fabric (thrifty AND patriotic - what a combo!).


4. Pin a piece of felt to the back side of your red/white/blue combo.  I used white, but it's your choice.  

5. Following your chalk outline stitch the front and back fabric together.  Leave just a small opening on one of the sides for the fiberfil.

6.  Cut your hearts out about 1/4" away from the stitch line.

7. Wash your hearts to bring out the chenille.  Why wash your felt first if you are just going to be washing it anyway?  Because you don't want any bleeding of the dye.  After all - you want a red white and blue ornament, not red pink and blue.

8. Stuff your heart, but not too full.  You want to be able to sew the opening shut with your sewing machine.

9. Finish your heart by adding a small clay star to it.  I sewed one directly to the heart.  Note: Sorry, I didn't take pictures while I made the clay stars.  Here's a lovely tutorial from my shine project.  I added a little bling by painting over the letters and rubbing off the excess so the USA stood out a little more.  Then I added just a hint of silver embossing powder to make the star look more like metal than clay.

10.  To turn your heart into an ornament use a seam ripper to remove just a couple of stitches from the top of the heart.  Tuck some twine into the newly created opening and stitch the opening closed (capturing the twine in the stitching).   Add a dab of fabric glue just for good measure.  


Just like that you are done!  Make sure you make a few, trust me, you can get a bunch out of 1/4 yard of felt.  They look great tucked amongst your family photos on a shelf or hung over a door knob.


Wednesday, June 5, 2013

Week 24 Recipe: Easy Pasta Bake


This week I took a break from Mexican food and thought I would try some yummy pasta.  The inspiration comes from Rachael Ray.  It's her Tomato, basil and cheese baked pasta.


The recipe is rated five stars, but most of the reviewers posted changes they had made to customize the recipe to their tastes.  Fair warning, other than the pesto and ricotta cheese I pretty much changed the whole recipe.  Sorry, Rachel.  Here's my version:

Ingredients:
8 servings
12 oz box of bow tie pasta
3/4 pound of hot italian sausage
1/4 pound of ground beef
1 cup of ricotta cheese
1 cup of pesto
1/2 cup parmesan cheese
1 24 oz jar of your favorite spaghetti sauce
1-2 cups of shredded mozzarella cheese

Instructions:
Preheat your oven to 350 degrees and get a pot of salted water boiling on the stove.  
Crumble the sausage and ground beef and brown in a skillet.  Drain and let cool slightly. 
Cook the pasta to a little bit less than al dente (9-10 minutes) and drain.
In a large bowl combine the pesto, ricotta and parmesan cheese.  
Add the meat and stir well.  
Toss in your pasta stirring again.
Lastly, add your spaghetti sauce and stir.  Note: I add this last because you might want to add more or less sauce based on your tastes

Pour this mixture into a foil lined 9 x 13" pan and cover with the mozzarella cheese.  


Place uncovered in the oven and cook for 30 - 40 minutes.  
Turn your broiler on and brown the cheese before serving.
This is delicious!  Everyone took seconds.  The pesto added a nice depth of flavor that elevated this above your typical baked pasta.  Even with everyone grabbing a second plate there were plenty of leftovers, which I'm sure will taste even better.


Week 24 Craft: Boo Pillow

I came across some crazy yarn trim recently in the clearance pile at Joann Fabrics; it was only 50 cents, so I couldn't pass it up.  I thought it might be fun to use it for something besides just trim, so I came up with this silly halloween pillow.


It's one of those projects that helps you eat up some of bits of extra trim and fabric you have lying around.  

Here's what you need:
Yarn (the orange and black is the trim I bought)
Rick rack or ribbon
2 pieces of 9" x 16" of black cotton
2 pieces of 9" x 16" scrap cotton for pillow insert
Polyester fiberfil
Marking pencil

1. Start by marking straight lines on one of the black pieces of fabric as a guide for your writing.


2. Play around with what you want your "boo" to look like.  The trim I used was about 3/8" thick, so I couldn't get too intricate.

3. Using a couching stitch sew  your trim to the fabric following your markings.  A couching stitch is just a fancy way of saying "sew over the trim to secure it to the fabric."


4. Once your letters are in place add your trim.  If you have a lot you can edge the whole piece; I just had a little, so I added it to the sides.

5. With right sides together sew your two black pieces of fabric together.  Leave an opening at the bottom large enough to insert your pillow form.

6. Next, take your two scrap pieces and sew them right sides together.  Again, leave an opening at the bottom, but this one just needs to be large enough to turn the fabric right side out.


7. Stuff firmly.

8. Insert your pillow form into your pillow and stitch the opening closed.


9. You're done!  And you have a one of a kind pillow to add a touch of fright to your favorite chair.


Saturday, June 1, 2013

Week 23 Craft: Hey, I'm working on it!

This week I got overambitious on my craft idea so I don't have a completed project.  I saw this great pin from recuerda mi corazon for day of the dead pullstring puppets.


It reminded me of a pullstring puppet I had made years ago for Christmas.


Mine is cross stitch glued to the board instead of painted and he sits on a painted stand for display.  Anyway...long story short...I thought I would design one for halloween and time got away from me.  But, I promise I will have it for you soon....maybe not next week....but soon.


Week 23 Recipe: 7 Ingredient Chicken Enchiladas

This recipe goes waaaaaaay back in my recipe book.  So far back that I don't need the recipe card for it anymore, and that's saying a lot because I can hardly remember where I put my keys from day to day!  It's one of those recipes that you can make healthy or rich, depending on your mood - Easy Chicken Enchiladas.


Ingredients:
1 lb of cooked chicken shredded (I use chicken breast, but you can use dark meat as well)
2 10 3/4 oz cans of  cream of chicken soup
1 4 oz can of chopped green chiles
1 small bunch of green onion sliced
1 cup of sour cream
8 flour tortillas (I use the 8" size)
1 1/2 cup of shredded cheese
                                                                                                                                                                      
Note: You can lighten the recipe by using light sour cream, Healthy Request cream of chicken soup and Carb Balance tortillas.  I suppose you could try low fat cheese as well, but that's just going a little too crazy if you ask me!  You can also add about 1/2 cup of water and put a little less filling inside to stretch the recipe a little further.  I DON'T RECOMMEND THIS IF YOU USE THE HEALTHY REQUEST SOUP because the consistency is already thinner.


Heat your oven to 350 degrees.
In a large bowl combine all ingredients except the cheese and tortillas.

Place 1/3 cup of chicken mixture on every tortilla as well as a tablespoon of cheese.  
Roll the tortillas and place in a well greased 9 by 11 pan (I line mine with foil for quick clean up and grease the foil). 
The goal is to leave enough of the chicken mixture so you can spread the extra on top.  

Spread the remaining mixture over the top of the rolled tortillas and sprinkle the rest of the cheese on top.  
Bake uncovered for 45 minutes until you have a pan of bubbly goodness.  
Serve and enjoy!