Wednesday, February 19, 2014

Finished needlepoint footstool

Oh. My.  Gosh.  I finally finished my needlepoint footstool.  Do you hear the angels singing?  I sure do.  This project has been ongoing for over a year!


I'm sure I could have done better on the staging, but frankly I'm too excited.  Even though this has taken me so long it has been a labor of love.

So, for those of you who have been with me through this entire project...it all started with how to paint a needlepoint canvas.


done...

Once the canvas was complete it was time to upholster and make the footstool.

My apologies, but this next part of the tutorial does not have many photos.  A lot of upholstering the stool was a two handed job; I just couldn't stop and take photos.

What you need:
1/2" thick board cut 1/2" smaller than the size of your needlepoint
1" thick upholstery foam cut to the size of the board
Warm and White brand batting cut several inches larger than needlepoint
Staples
Decorative trim
Fabric glue
Wood glue
Paint
Stain
Polyurethane

Instructions:
1. Place the batting on a sturdy surface, center the foam over it and then place the board on top of the foam.  Pulling the batting very tightly you want to staple in place on the board.   That's why I recommend Warm and White brand; it really holds up to the tugging.  I stapled about an inch from the edge; I recommend that so when you staple your needlepoint in place you won't be stapling over the staples from the batting.  Trim the excess; especially the corners.

2. Now place your needlepoint over the "cushion" you have just created.  Make sure it is centered!  Turn over and staple in place.  Again, you want to make sure everything is taut, but go slow!  You don't want to warp your canvas.

3. Once your canvas is stapled in place glue your trim to the edge.  My trim had a selvage, so I needed it to be in place before I glued it to the footstool.  Trim the excess; you want to make sure you get out the bulk - especially around the corners.  But, be careful!  You don't want any cut edges showing around your cushion.  If you are using trim with no selvage (gimp) then you could glue in place once the cushion is glued to the footstool.  Again...trim the excess, but be careful you don't end up with raveled edges showing.


4. On to your footstool!  No instructions here...sorry, but hubby made the box for me and he had completed it before I had a chance to get any photos.  Here are the pieces cut:


And here is the completed box:


What you want is a box that is 1 1/2" larger than your finished needlepoint and 5" deep.  Make sure the box has a top and bottom.  I used round "feet" that I had purchased at a local upholstery fabric shop.  I'm pretty sure that Home Depot and Lowes carry some as well.

5. Paint your box and feet.

6. I thought the box looked a little plain, so I added a stencil.  You can select an image from the web and print it out; I just typed Aloha into a "word" document, enlarged it until I was happy and printed it out.  

This is a pretty straightforward freezer paper stencil.  If you have never done one before here is an easy to follow tutorial from the Farrar Four blog.  Surprisingly, the freezer paper adhered pretty well to the painted wood! 


I dry brushed the stencil to give it a little bit of an aged look.


7. Next, I taped off lines on the box and dry brushed in a couple of stripes.  Note that I left most of the top unpainted; this is so the glue will adhere better.  


8. To tone down the paint even more I went over the paint with some walnut stain and wiped it off.  After everything dried I added a couple of coats of polyurethane.  

9. Once the polyurethane has dried for several days it's time to glue your cushion in place.  Note: if your feet need to be screwed into place make sure you drill your screw holes before glueing the fusion in place.  

10. Spread your glue on the top and carefully put your cushion in place.  You don't want any glue seeping out, so don't get too close to the edges.  Once you are satisfied put a towel (or something else soft) over the cushion to protect it.  Place a piece of wood that is at least as large as the cushion on top and then clamp in place.


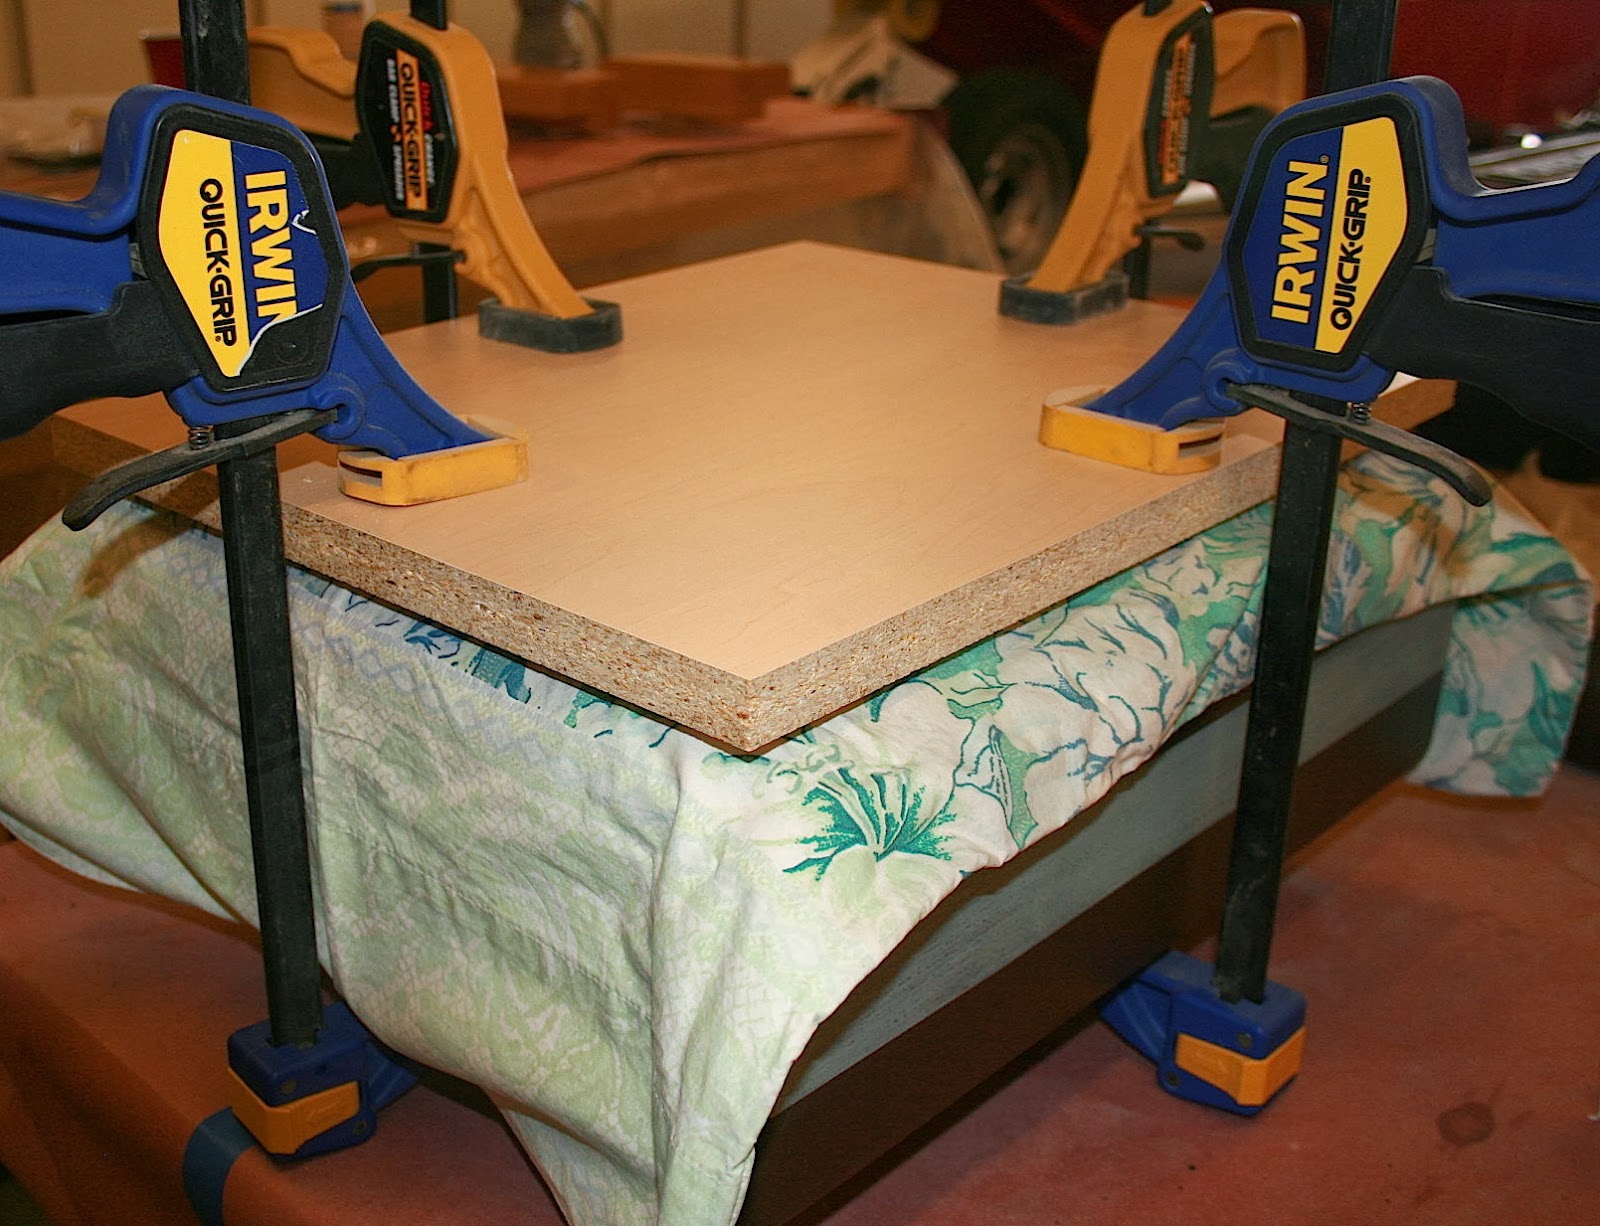
If you don't have clamps then weight the wood down with something VERY heavy.  You want to make sure the cushion stays in place.

11. Once the glue is dried go ahead and put your feet in place.  If your feet screw in place make sure you drill the holes before glueing the cushion in place.

Just like that...and 14 months later...you are done!


Time to sit back and put your feet up!


Saturday, February 8, 2014

Wreath of a Million Hearts

OK, OK...I know it's not really a million hearts, but who's counting.  This is a sweet little valentine door wreath that is literally an explosion of hearts.


What you need:
18" Styrofoam wreath
Fat quarters of fabric in four coordinating colors
Heart shapes cut on paper
Fiberfil
Fray check
Hot glue gun
Stuffing tool
Ribbon
Sewing machine

Instructions:
1. Start by cutting out different shaped hearts on paper.  The sizes should range from 5" tall to about 1" tall.  NOTE: If this is a project you think you will make multiple of go ahead and laminate your hearts.  This also makes them easier to trace around.  

2. Fold your fabric in half - right sides together; trace the heart shapes onto the wrong side of your fabric.  You will want between 8-12 of the largest size, 8-12 medium, etc.  Make at least 15 of the smallest size; those will be used to fill in blank spaces.   Make sure you are cutting some of each size in all fabrics.  You will need at least 60 hearts.


3. Set your machine to a short stitch.  Carefully sew all the way around each heart.  Instead of leaving a small opening for turning, you will be cutting a small slit in the back.  This step will save you a TON of time, and you won't see the slits because they will be glued to the wreath.

4. Cut the hearts out about 1/8" outside of the stitching.  Whew!  That DID feel like a million hearts, didn't it?

5. Now the not so fun part.  Run a bead of fray check along the stitching of BOTH SIDES of every heart.  I know this is no fun, but it is important.  You want the detail of the heart to be clear when you turn them right side out.  For this to happen you will need to clip the curves of your seams and you don't want the seams of your hearts to give way as you turn them.

6. Once dry, clip the curves of your hearts and make a small slit in the middle of each heart.  Make sure you only make the slit in one side of the fabric!

7. Turn your hearts right side out and fill them with the fiberfil.  You will need a stuffing tool to get into some of the smaller hearts as well as the points of the larger hearts.  Don't have a stuffing tool?  Grab lunch at your favorite Chinese restaurant and bring home an extra set of chop sticks.  Make sure they are the disposable kind; don't take a nice set of chop sticks!!

Here's a picture of the backside of the heart that shows where you should cut the slit.

We are now back to a fun part!  

8. Take a piece of ribbon and tie it around the wreath form - leaving a gap so you have something to loop over your wreath hanger. 


Time to start glueing your hearts to your wreath.  


9. Start with your largest hearts and space them somewhat evenly around the wreath form.  Once you are happy with the layout glue the hearts in place.  

10. Next, move on to the medium hearts.  Start filling in the blank spots on the wreath....and so on, and so  on....  You can see how I have tucked the hearts in and around.


11. Keep going until the wreath is completely covered.


Tuesday, December 31, 2013

Some final thoughts for the year

2013 started with a challenge to create a recipe and craft that I had found on Pinterest for every week.  Well, 2013 is ending and I didn't quite make it.  I was able to get 39 crafts and 30 recipes posted.  Truthfully, I was able to get through the 52 crafts and 52 recipes, I just wasn't able to write about all of it.

Why, you ask?  Some of the crafts fell into the "epic fail" category.  My favorite was the cement jack-o-lantern.  Here's the original from fox hollow cottage:

…and here's mine:


Not so great.

Some of the crafts I did just like the post, so there wasn't any point in re-inventing the wheel.  Most of the crafts I just didn't take the time to take photos as I went along.  If often wasn't practical (hard to take a picture when you need both hands to be working on the craft), or I was covered in glue/paint and didn't want to stop, clean up and snap the picture.

My favorite craft this year was a mixed media piece I made based on the inspiration (and great tutorial) from Christy Tomlinson's website.  Her Christmas tree was amazing, so I thought I would give it a whirl.


Saturday, December 21, 2013

Week 39 Craft: the Green and White Wreath

I was absolutely obsessed with the idea of a green and white Thanksgiving!  There were such beautiful centerpieces out there on the world wide web.

 from Sonja Bannick

I couldn't find original websites for these two, but inspiring just the same:


My old Christmas wreath was starting to show some wear and tear, so I thought I would update it this year, and that green and white theme was still rolling around my brain.  Here's what I put together:


I just love it!  Both Michael's and Hobby Lobby seemed to feel that shiny was the way to go this year, so who am I to argue?  

What you need:
1 bush Pointsettia flowers (Michaels)
2 sprigs of frosted pine cones (Michaels)
3 Bushes of frosted white fern (Michaels)
 14"Styrofoam wreath (Hobby Lobby)
Jingle bells (I had mine from last year, but you can find them anywhere)
Assortment of Christmas balls (raid your supply)
Crystal snowflake (Hobby Lobby)
Glue gun
Wire cutters

How to:
1. Cut the fern stems off the bush and glue around your wreath form.  Start with the widest part on the inside and let the tips hang past the edges (it makes your wreath look larger).  NOTE: Love these ferns, but expect your work area to look like a strip club for the next few days.  There was glitter EVERYWHERE!!
2. Cut the stems off the frosted pinecones and glue around your wreath on top of the ferns.  I didn't want anything to be too "matchy-matchy" so I spaced then unevenly.
3.  Next layer is the poinsettias.  I used the rule of three and again didn't space them quite evenly to make the wreath look more natural (wait...glitter and crystals natural?)
4. Time to start tucking jingle bells and ornaments in to peek out from the poinsettias and pinecones.  Put as many or as few as you like.
5. The finishing touch was to add the crystal snowflake.  I did want this to stand out a little, so I glued it in a somewhat open area.


Monday, December 9, 2013

Week 30 Recipe: Welsh Rarebit with Tuna and Peas

Growing up my mom used to make this wonderful concoction of cheesy, gooey goodness that she always called welsh rarebit.  Recently, I went on an internet search to locate this recipe.  How sad it was to find out that what my mom made had very little in common with welsh rarebit!  But, how happy I am that I get to share her recipe with you.


Ingredients for 2 servings:
1 5oz can of tuna drained
1/2 of a 7oz can of peas drained
4 oz of sharp cheddar cheese shredded
2-4 T of milk (I used 2%)
1T of flour
1T of butter
salt and pepper to taste
Two slices of a nice, hearty bread

Instructions:
Over medium heat in a small saucepan mix the flour and butter to make a rue, cooking for several minutes.  
Lower the heat and add 2T of milk to the rue.
Slowly add the cheese.  Stir until it melts before adding more cheese.  At first it will look like this:
Gross!

Be patient, in a minute or two it will look like this golden goodness:


Add additional milk if your sauce seems too thick.  You are looking for a nice, ribbon consistency (like cake batter).

Stir your tuna in and add salt and pepper to taste.  When you are happy with the consistency and seasoning add your peas (stir just to combine) and remove from the heat. 

Toast up some of your favorite bread; while your bread is toasting heat up your broiler.  Pour the mixture over the toasted bread and place under the oven broiler; remove it once those heavenly brown spots start showing up on your cheese mixture.

Remove and enjoy.


Week 38 Craft: Distressed Sled

Ah, Christmas.  The house smells like balsam (thanks to my Bath and Bodyworks plug-in), all the decorations are up…and new craft ideas call my name.  I thought I had my supply purchasing addiction under control until Michael's introduced their new email program.  A different sale every day?  How can I possibly resist?

This week's project comes from a great post by kristieshelton.com  These distressed terra-cotta pots look amazing, and the tutorial is very easy to follow.

Hope I'm giving the proper credit; I always try to link back to the original source, but sometimes that's not always easy.  Anyway…I ran across the balsa wood section at Michael's and thought I'd try these mod-podge transfers out.   Here are what my two projects turned out like:


Here's what you need:
Unfinished sleigh (found mine at Michael's on sale for $3.99)
White cutting board (Michael's again for $2.99)
Jingle Bells (Michael's one more time…what can I say…they had a great sale!)
Craft Paint
Printer
Mod Podge
Brushes
Stain
Sprigs of faux greenery (I snagged a few from an existing garland)
Pinecones (snagged from a neighbor's yard)
Twine
Glue gun
Sandpaper
Polyurethane

Instructions:
1. Open a word document and type in your favorite Christmas sentiment in your favorite font.  For my project I used "Harrington" in a size 72.  Make sure you reverse the phrase before printing; I have a Mac, so I had to convert the document to a PDF and selected "preview", then "layout" and "flip horizontally".  

2. Cut our your letters.  Because mine were relatively simple (and because I wasn't placing them on a white background) I removed all the white around the lettering.  NOTE: because my letters were simple, and solid, I didn't worry about smearing.  If you have detail you wish to remain crisp DO NOT use a laser printer. 

smearing :(

3. Sand your wood.  This isn't totally necessary, but it seems like the balsa pieces are always rough.  It's also nice to knock off the sharp edges to help with the overall distressed look.  On the white cutting board you want to sand just to expose some of the raw wood.

4. Paint your wood.  I started with burnt umber on the sleds of the sleigh and then covered the whole piece in a taupe paint.  For the cutting board I used a dark green and once that dried used a very dry brush to apply some of the taupe over the green.
5. Once the paint is totally dry sand your sled (or cutting board) to give the piece a distressed look.  Think about where the most usage over time would show up (edges).  Don't worry, you will distress your lettering as well.  But, if you waited to do the sanding until after you applied your lettering the lettering would be sanded off before you got to the paint below.


6. Now it's time to modpodge your lettering in place.  Start by doing a dry run and decide where it will look best.  


Apply a layer of modpodge to the INK side of the lettering and press onto your sled (or cutting board).  Let this dry….COMPLETELY.  You will be tempted to start removing the paper layer, but if you don't wait 5-6 hours (even better to leave overnight) you will end up rubbing the ink right off.  And you will be sad.

7. Once COMPLETELY dry it's time to get the paper wet and CAREFULLY rub it off the wood.  Slow and steady wins the race here, and even then you will most likely remove some of the ink.  Lucky for you this project is all about looking distressed, so it's no problem.


8.  Time to let everything dry again!  

9. Once dry go back in with very fine sandpaper and distress the letters even more.  Expose some of the paint beneath.

10.  Now grab your favorite stain and cover your sled (or cutting board) with a thin coat.  Don't saturate the piece up like you normally would, use a small amount.  

You also don't want to leave it in place for a long time.  Like Daniel san in Karate Kid - wipe on, wipe off.  The stain further distresses the piece, softening the color of your paints, staining the raw wood, and adding overall a nice "depth" to your project.

11. Time for more drying.  This time you definitely want to wait overnight.  Ugh. 

12.  Polyurethane your project and guess what?!?!  More drying!  Don't skip this part; you want your project to last year after year.  Here's the sled ready for it's bling.


13.  Dealer's choice on this one.  I added greenery, some twine, bells and pinecones.  

14.  Time to stand back and admire your handiwork!