Tuesday, August 5, 2014

Grandparent's Day

Did you know that in 1978 the first Sunday of September after Labor Day was proclaimed to be "National Grandparent's Day"?  There's even an official song for the day - A Song for Grandma and Grandpa by Johnny Prill.

This year that happens to fall on September 7.

Why not show a little extra appreciation for all that your grandparents do?  My shop has many things to choose from, some specific to Grandma/Grandpa and some just to say "I love you".


Happy Grandparent's Day!!


Saturday, August 2, 2014

Pier 1's 3 Napkin Apron

Pier 1 Imports is such a great store; I always find inspiration for something there.  Right now (August, 2014) they are having a huge sale and I just couldn't resist.


I found these fabulous cloth napkins, but anyone who knows me knows that I am not a cloth napkin kind of girl!  Solution?  The three napkin apron!

What you will need:
3 napkins from Pier 1 Imports - 2 of the same and one coordinating 
sewing machine and matching thread
Cutting board
Ruler
Rotary Cutter
Button


1.  The napkins are 21" "squarish".  At least they are close enough that it works.  Start by determining which way you want the pattern on the apron to go on the two matching aprons.  These will become the bib and bottom of the apron.  Using your rotary cutter take the finished seam off of the bottom of one of the napkins and the top of the other.


2. With WRONG SIDES TOGETHER - pin the two raw edges together and sew 1 1/2" seam.


Press the seam open.  This seam on the right side of the fabric will be covered by the waistband and makes sure you don't have any raw edges showing anywhere on the apron.

4.  Cut the coordinating fabric into 5 strips.  Two that are 5 1/2", 2 that are 2 1/4" and one that is 4".  Depending on how off square your napkin is you might have to make the 4" section a little narrower.  Note: Make sure you leave the "ends" in tact.  That way your apron stays the full 21" wide and you don't have to re-finish any of the seams!

5.  Using the 4" piece turn under (and press) 1/4" on each of the long sides.  Lay it right side up on top of the apron bottom and top sections.  Make sure the seam is centered in the band.  If the ends don't quite line up run a gathering stitch on the part that is too long and adjust it to fit.  
As close to the edge as possible, sew the waistband into place.  Leave the ends open.

6. Now take the 2 5 1/2" strips and fold them in half RIGHT SIDES TOGETHER.  Using a 1/4" seam allowance sew along the raw edges and also sew one of the ends together (use a wide enough seam allowance that you don't catch the finished seam from the napkin into  your stitching).  Trim and turn right side out, making sure you ease the corners to make them nice and sharp.  Press.

7.  Decide how tall the bib portion of your apron should be.  Do you prefer that the waistband sets more on your hips?  Leave it longer.  Like it at your waist?  You will need to cut more off.  Just make sure you leave the top 1 1/2" longer than you need it.

8.  Turn under 1/4" on the top of the bib and then another 1 1/4".  Sew as close to the edge as possible, making a casing.

9.  Trim off the finished hem on one end of each of the 2 1/4" strips and with RIGHT SIDES TOGETHER sew them together on the trimmed end.  Press the seam open and then fold, and pin, the strip in half lengthwise.  Using a 1/4" seam allowance sew it together leaving a few inches on each end open.  Turn right side out and press.

10.  Pin a safety pin to one end of the neck strap and run it through the casing.  Decide where the neck fits comfortably and still allows you to slip the apron over your head.  Trim off the excess, leaving enough for a 1/2" seam allowance and sew the neck strap RIGHT SIDES TOGETHER.  Note: Make sure you have not twisted the neck strap!!!!!

11.  Press the seam allowance and then sew as close to the edge as possible.  Pull the neck strap through the casing so that the sewn section is hidden in the apron bib casing. 


7. Pin the bands into place and adjust the fit.  This apron does not have ties; it buttons into place.  Because of this, one band will be left long and the other will be shortened.  You want the short band to be long enough for the other band to be able to button into place.  Cut the bands to the length that will work for you...KEEPING IN MIND YOU NEED TO LEAVE ENOUGH TO BE ABLE TO SEW INTO THE WAISTBAND.

8.  Tuck each band into the open ends of the apron waistband - one on each side.  Sew into place.

9.  Pick a fun button and sew it to the short band and sew a button hole on the end of the long band.

10 Yippee!!!!  Apron complete.  It's too adorable, and made out of fabric you just can't find at your local fabric store.


Tuesday, March 4, 2014

Upcycled Easter Centerpiece

March is "National Craft Month".  I sincerely hope everyone celebrates by crafting more than ever, or crafting for the very first time!  March is also the start of the Easter season, and that's where the inspiration for this craft comes into play.

A few Christmas' ago my husband received the BEST gift basket!  The basket was shaped like a top hat and was filled to the brim (Ha, bad pun!) with delicious treats.  I loved the basket so much I kept it around, but knew I wanted to do something a little different with it.  So, here is the original:

No...I am not that bad of a housekeeper!  It has been stored in my husband's woodworking shop (I swear).  And here is what I transformed it into:


Here's what you need:
Top hat basket
Bunny pattern
Sand paper
Craft paint
Paintbrushes
1/3 yard of good quality muslin
Scrap of green fabric for lettuce
Ribbon for lettuce (wired), trim on hat and carrot tops (not wired)
2 black buttons 
Fiberfil
Floral wire

Instructions:
1. Lightly sand your basket.  You could probably get away without sanding it; it's not like this needs to hold up to lots of wear and tear.  Paint with your favorite easter color.  Make sure you use a stiff paintbrush that you don't like to paint the basket.  You really need to get into those nooks to cover up that black.

2. Find your favorite bunny or teddy bear pattern; you will only need to make the head and hands.  I can't share the pattern I used because it's copyrighted, but there are tons of patterns out there on the web.  The pattern I used was for a 16" bear.  I wanted something big enough so he would take up about half of the opening. 
3. Sew the head and hands.  Add "fingers" to the hands by stitching two lines per paw about 3" up.  Stuff loosely.
4. Take a piece of floral wire that is about as long as the paw and twist the end over so it isn't sharp.  Insert it into the middle finger of the paw.  This is so you will be able to bend it slightly so the bunny looks like he is gripping the top of the basket.  Do the same for the ears (but do not stuff them).


5. After you stuff your rabbit's head add the button eyes.  I sewed mine into place, but you could glue them in place if you prefer.

6. Paint your bunny.  I used two coats of a "latte" color and a pale pink for the ears and nose.  I wrapped his eyes with foil so they wouldn't get paint on them.

That is one creepy rabbit!

7. After the paint is dry lightly sand the rabbit to smooth the surface.  Make sure you use a light touch; you don't want to sand off all the paint!  I took a pink sharpie and added an outline around the ears and nose just to give a little more contrast.  I also used the leftover wire from my head of lettuce to make whiskers for Mr. Rabbit.  Just thread it through a needle, poke it in one side and out the other.  Not only are being thrifty...the wire easily bends into whatever shape you want.


8.  On to the head of lettuce.   I cut a piece of green fabric the size of a dinner plate and ran a gathering stitch around the edge.  Gather into a circle making sure you leave a spot large enough to add stuffing.


9. Stuff and sew the opening closed.  


10. Take your wired ribbon and pull a tiny bit of the wire out.  Tie it into a knot or "stitch" it through the ribbon.  You are going to be using the wire to gather the ribbon so you DON'T want it to pull through.  Gather the ribbon.  I used three yards and probably gathered it down to one yard.


11.  Leaving about an inch, cut the excess wire off.  Don't throw it away!  You will use it for whiskers later on.

12.  Just like you are making a ribbon rose, start a small roll on the end and stitch onto the top of your lettuce head.  Wind it around and around, stitching into place as you go.  I left about an inch between rows.


My three yards did not cover the whole lettuce head, but it doesn't need to.  Not only will you be tucking into the basket, but I thought the exposed bottom actually looked like a real head of lettuce.


Love how the lettuce turned out!!


13. Next it is time to make some carrots.  I made chenille carrots.  Here's my post on how to make chenille.  If you don't want to make chenille carrots you can just use orange fabric.  My carrots are about 10" long.  The green tops were made with 3/8" unwired ribbon that I made about five 6" loops and tucked into the top of the carrot AFTER it has been stuffed, but BEFORE you sew it shut.

14. Load up your basket.  You will find that you need to fill it about half way before you start adding your veggies and rabbit or else it will just sink in.  Here's my secret: ssshhhhh....I just grabbed some flannel I had lying around and stuffed it until it was about half full.  I'm guessing you could use newspaper, or styrofoam scraps, but I wouldn't spend any money on whatever you use.  Cover your filling with a scrap of green fabric so it blends with the lettuce, although you could use brown so it looks like garden soil! 


15. Tuck Mr. Rabbit and all his veggies into place.  Now is the time to gently bend the hands and ears to get them into position.

16.  Wrap ribbon around the base and add a bow.


Wednesday, February 19, 2014

Finished needlepoint footstool

Oh. My.  Gosh.  I finally finished my needlepoint footstool.  Do you hear the angels singing?  I sure do.  This project has been ongoing for over a year!


I'm sure I could have done better on the staging, but frankly I'm too excited.  Even though this has taken me so long it has been a labor of love.

So, for those of you who have been with me through this entire project...it all started with how to paint a needlepoint canvas.


done...

Once the canvas was complete it was time to upholster and make the footstool.

My apologies, but this next part of the tutorial does not have many photos.  A lot of upholstering the stool was a two handed job; I just couldn't stop and take photos.

What you need:
1/2" thick board cut 1/2" smaller than the size of your needlepoint
1" thick upholstery foam cut to the size of the board
Warm and White brand batting cut several inches larger than needlepoint
Staples
Decorative trim
Fabric glue
Wood glue
Paint
Stain
Polyurethane

Instructions:
1. Place the batting on a sturdy surface, center the foam over it and then place the board on top of the foam.  Pulling the batting very tightly you want to staple in place on the board.   That's why I recommend Warm and White brand; it really holds up to the tugging.  I stapled about an inch from the edge; I recommend that so when you staple your needlepoint in place you won't be stapling over the staples from the batting.  Trim the excess; especially the corners.

2. Now place your needlepoint over the "cushion" you have just created.  Make sure it is centered!  Turn over and staple in place.  Again, you want to make sure everything is taut, but go slow!  You don't want to warp your canvas.

3. Once your canvas is stapled in place glue your trim to the edge.  My trim had a selvage, so I needed it to be in place before I glued it to the footstool.  Trim the excess; you want to make sure you get out the bulk - especially around the corners.  But, be careful!  You don't want any cut edges showing around your cushion.  If you are using trim with no selvage (gimp) then you could glue in place once the cushion is glued to the footstool.  Again...trim the excess, but be careful you don't end up with raveled edges showing.


4. On to your footstool!  No instructions here...sorry, but hubby made the box for me and he had completed it before I had a chance to get any photos.  Here are the pieces cut:


And here is the completed box:


What you want is a box that is 1 1/2" larger than your finished needlepoint and 5" deep.  Make sure the box has a top and bottom.  I used round "feet" that I had purchased at a local upholstery fabric shop.  I'm pretty sure that Home Depot and Lowes carry some as well.

5. Paint your box and feet.

6. I thought the box looked a little plain, so I added a stencil.  You can select an image from the web and print it out; I just typed Aloha into a "word" document, enlarged it until I was happy and printed it out.  

This is a pretty straightforward freezer paper stencil.  If you have never done one before here is an easy to follow tutorial from the Farrar Four blog.  Surprisingly, the freezer paper adhered pretty well to the painted wood! 


I dry brushed the stencil to give it a little bit of an aged look.


7. Next, I taped off lines on the box and dry brushed in a couple of stripes.  Note that I left most of the top unpainted; this is so the glue will adhere better.  


8. To tone down the paint even more I went over the paint with some walnut stain and wiped it off.  After everything dried I added a couple of coats of polyurethane.  

9. Once the polyurethane has dried for several days it's time to glue your cushion in place.  Note: if your feet need to be screwed into place make sure you drill your screw holes before glueing the fusion in place.  

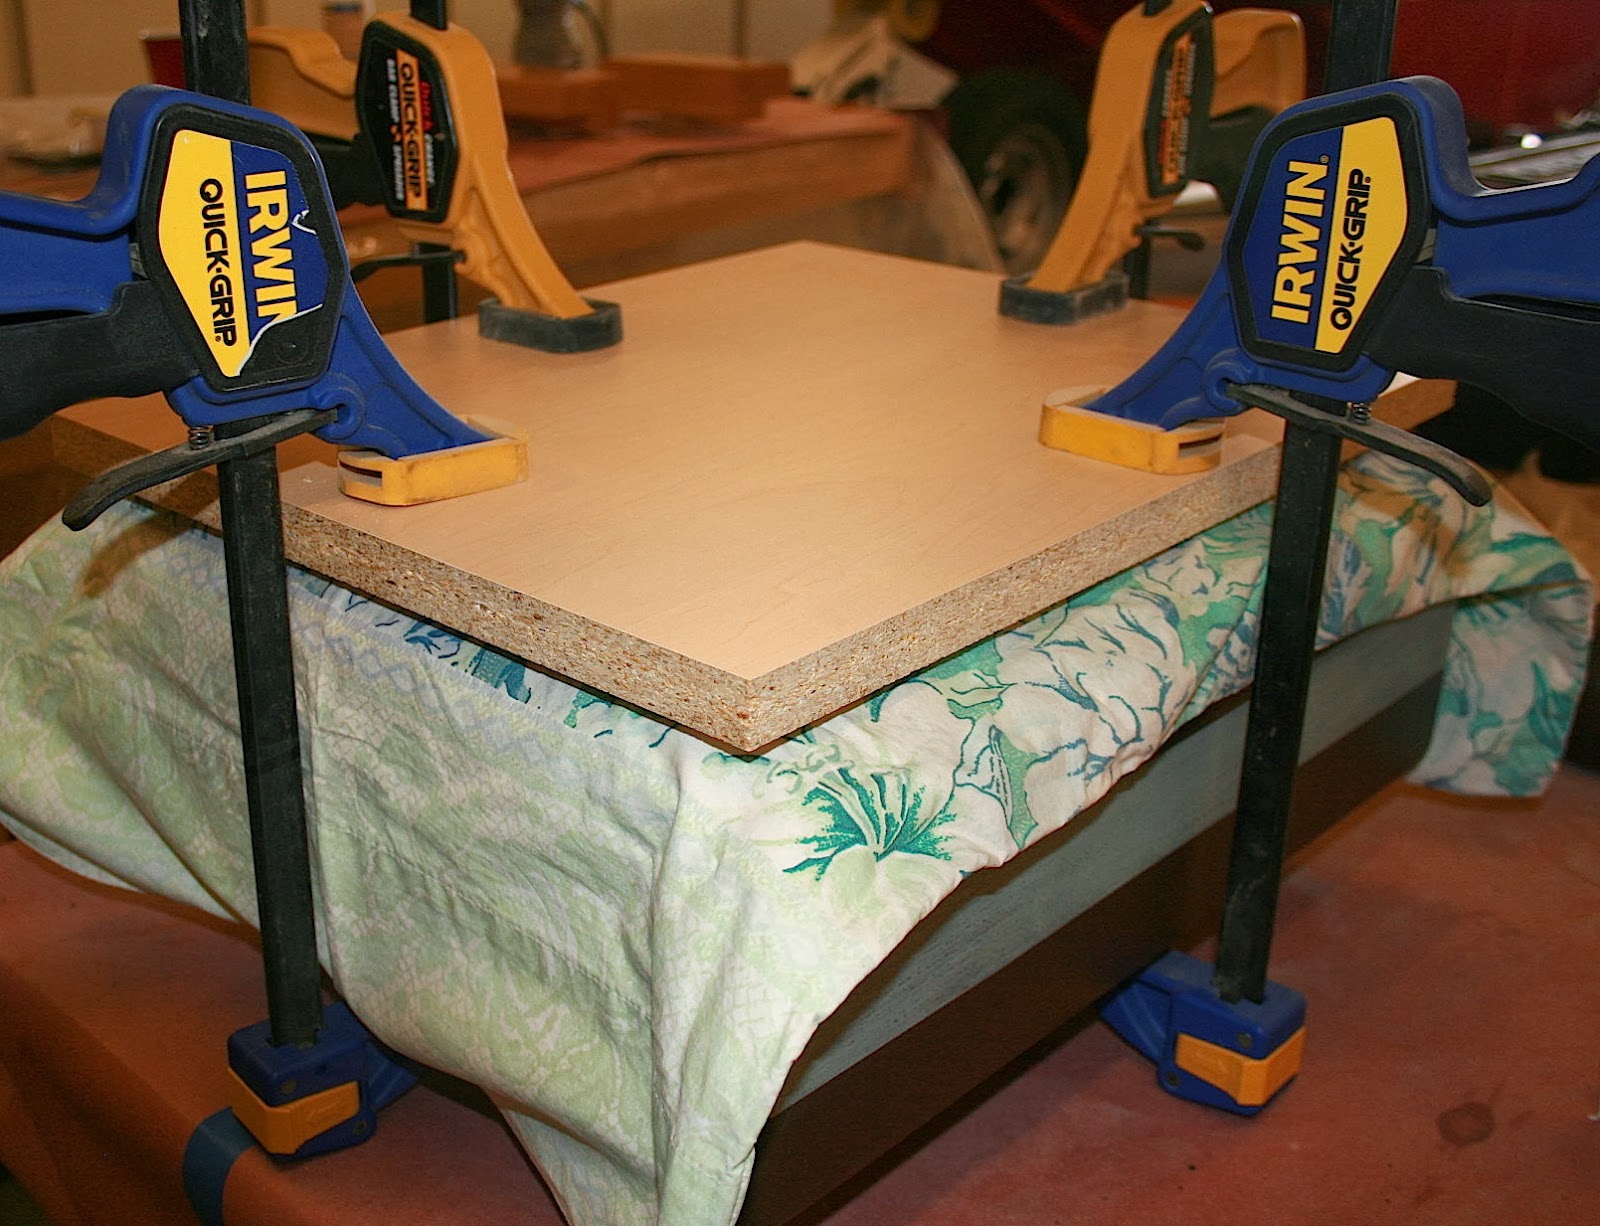
10. Spread your glue on the top and carefully put your cushion in place.  You don't want any glue seeping out, so don't get too close to the edges.  Once you are satisfied put a towel (or something else soft) over the cushion to protect it.  Place a piece of wood that is at least as large as the cushion on top and then clamp in place.


If you don't have clamps then weight the wood down with something VERY heavy.  You want to make sure the cushion stays in place.

11. Once the glue is dried go ahead and put your feet in place.  If your feet screw in place make sure you drill the holes before glueing the cushion in place.

Just like that...and 14 months later...you are done!


Time to sit back and put your feet up!


Saturday, February 8, 2014

Wreath of a Million Hearts

OK, OK...I know it's not really a million hearts, but who's counting.  This is a sweet little valentine door wreath that is literally an explosion of hearts.


What you need:
18" Styrofoam wreath
Fat quarters of fabric in four coordinating colors
Heart shapes cut on paper
Fiberfil
Fray check
Hot glue gun
Stuffing tool
Ribbon
Sewing machine

Instructions:
1. Start by cutting out different shaped hearts on paper.  The sizes should range from 5" tall to about 1" tall.  NOTE: If this is a project you think you will make multiple of go ahead and laminate your hearts.  This also makes them easier to trace around.  

2. Fold your fabric in half - right sides together; trace the heart shapes onto the wrong side of your fabric.  You will want between 8-12 of the largest size, 8-12 medium, etc.  Make at least 15 of the smallest size; those will be used to fill in blank spaces.   Make sure you are cutting some of each size in all fabrics.  You will need at least 60 hearts.


3. Set your machine to a short stitch.  Carefully sew all the way around each heart.  Instead of leaving a small opening for turning, you will be cutting a small slit in the back.  This step will save you a TON of time, and you won't see the slits because they will be glued to the wreath.

4. Cut the hearts out about 1/8" outside of the stitching.  Whew!  That DID feel like a million hearts, didn't it?

5. Now the not so fun part.  Run a bead of fray check along the stitching of BOTH SIDES of every heart.  I know this is no fun, but it is important.  You want the detail of the heart to be clear when you turn them right side out.  For this to happen you will need to clip the curves of your seams and you don't want the seams of your hearts to give way as you turn them.

6. Once dry, clip the curves of your hearts and make a small slit in the middle of each heart.  Make sure you only make the slit in one side of the fabric!

7. Turn your hearts right side out and fill them with the fiberfil.  You will need a stuffing tool to get into some of the smaller hearts as well as the points of the larger hearts.  Don't have a stuffing tool?  Grab lunch at your favorite Chinese restaurant and bring home an extra set of chop sticks.  Make sure they are the disposable kind; don't take a nice set of chop sticks!!

Here's a picture of the backside of the heart that shows where you should cut the slit.

We are now back to a fun part!  

8. Take a piece of ribbon and tie it around the wreath form - leaving a gap so you have something to loop over your wreath hanger. 


Time to start glueing your hearts to your wreath.  


9. Start with your largest hearts and space them somewhat evenly around the wreath form.  Once you are happy with the layout glue the hearts in place.  

10. Next, move on to the medium hearts.  Start filling in the blank spots on the wreath....and so on, and so  on....  You can see how I have tucked the hearts in and around.


11. Keep going until the wreath is completely covered.