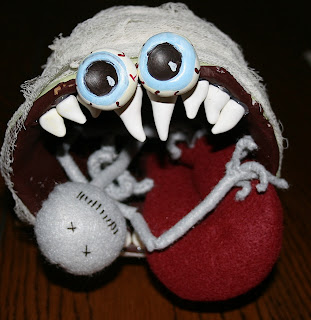
Cornucopias are cool. To me they are the often overlooked fall decoration. Sure, you see them on Thanksgiving tables, but other than that? Not so much. Well, I've decided to change that and give a little extra life to the cornucopia. Behold the creepy cornucopia!
With a little guidance from you this is a totally fun kid project.
What you need:
Cornucopia
Newspaper
Flour and water
Sculpy clay
Felt
Craft paint
Cheesecloth
Glue gun
Wire
1. Take a piece of wire about a foot long and bend it into a three pronged foot - think "chicken leg". I used some coated wire my hubby had laying around his shop; you can purchase it at Home Depot. It's more flexible than a coat hanger, but about the same thickness.
2. Work the wire feet into the cornucopia. This took a little bit of time to figure out where to place the feet and balance the cornucopia; it might be a little easier if you change his "tail" so it points up. You can also see I trimmed the decorative braid and feet off my cornucopia. It's up to you whether to remove those pieces or not. If so, they clipped off very easily with a pair of wire cutters.
Once you are happy with the placement you need to bend the wire inside the cornucopia so it stays in place. The paper mache will also help hold the feet in position.
3. Make some paper mache! CLICK HERE for some paper mache recipes. I haven't used this stuff since grade school, but now that I have rediscovered it I'm going to find more ways to use it. Beware! It makes a monster of a mess. Make sure you have tons of newspaper on your work space to catch the glop. You want to completely cover the inside and outside of the cornucopia as well as the monster's claws.
4. Let the paper mache dry overnight. Bummer! I'm an instant gratification kind of gal, so I hate waiting. But, if you don't let it completely dry you end up with a moldy craft project down the road.
5. Good news! While your monster is drying you can work on his personality. Grab your Sculpy clay and make his eyes and teeth. My monster has crooked gnarly fangs, but sweet baby blue eyes.
6. Next is his tongue. Grab two pieces of felt and sew them together. Turn right side out and stuff VERY LOOSLY with fiberfil. For definition I stitched a line about two thirds up the middle. My tongue....well, my monster's tongue...is about 3" wide by 6" long.
I think my next beast will have a forked tongue.
7. While your monster's eyes and teeth are baking it's time to distress your cheesecloth. You can "age" the cheesecloth in a multitude of ways, but I chose to soak mine in some leftover brewed coffee. After you let it dry cut it into strips.
8. Once your beast is dry it's time to paint his body. I chose a moldy green for the exterior and a dark blood clot red for the inside. For his claws a chose a darkish gold.
9. Using your trusty glue gun glue his eyes and teeth into place. Note: This through my little monster off balance and I had to add some stones into his belly to bring back his equilibrium.
10. Wrap the cheesecloth around his body; you can tuck or glue the ends into place.
11. Glue the monster's tongue into place and you are done!


No comments:
Post a Comment