Friday, April 26, 2013

Week 17 Craft: Quilted Table Runner

Imagine it's October as you read this.  Just picture it - warming your hands on your cup as you sip on a hot cider, the crisp air, the howl of the wind sending a chill down your spine...it's halloween.

If you have a sewing machine you can create this table runner and impress your friends with your mad skills.


What you need:
How much fabric you will need depends on what size you want to make your runner.  Mine is 55" long by 14" wide.  I used about 1/3 of a yard of five different fabrics and 2 yards of my backing fabric.  Yes, I am aware I could have bought MUCH less of the backing fabric, but I didn't want a seam, and I plan on making several of these.
1/2 yard of Warm and White cotton batting
Sewing machine
Thread
Lots of safety pins

Instructions:
1. The rules are there are no rules.  The whole point of this table runner is to have it look a bit off.  Start cutting strips of fabric in various widths.  Mine range in width from 1 1/2" to 4 1/2".  Mix it up!  I even cut different widths within the same fabric.


2. Lay your strips on a flat surface (otherwise known as my entryway) and play with the arrangement until you are satisfied.  Again, no rules.  I didn't place the fabrics in a particular order; I didn't even use the same number of each fabric.  I ended up using 23 strips.


3. Pick one end as your start and sew each strip together using a 1/4" seam allowance.  Mark your "start" strip by folding one corner and pinning it.  There is nothing worse than forgetting which end you started with, sewing your strips out of order and having your table runner look all funky.  NOTHING WORSE?  OK, maybe I need to reset my priorities...

4. Once your strips are sewn press the seams.  You can press them to one side or press them open; it's a personal preference.

5. On a flat surface layer your backing fabric wrong side up, the batting and then your runner (right side up).  Smooth everything to make sure you have no wrinkles and then pin the heck out of it.

6. Select a longer stitch length on your machine and adjust the tension until you are happy with it.  

7. Pick a strip in the middle of your table runner and start sewing.  You want your lines to be not quite straight; let them wander a little left and a little right.  You can even let them cross over each other.  Just make sure you stitch and stitch and stitch - and then stitch some more.

An important thing to keep in mind is that you don't want to pull too much on your fabric as you sew.  It's so tempting to keep it pulled tight to ensure no wrinkles, but that can cause the batting to stretch and you can end up with a wavy edge that won't go away.

8. Sew to one end and then starting in the middle sew to the other end.  

9. Once all your rows are sewn trim your runner to straighten the edges and then bind your quilt.  If you have never done this before here is a link on how to bind a quilt.

10. All that is left is to sit back and admire your work.


I used orange thread in my bobbin so the quilting on the back would stand out more texturally.  And yes, this is reversible, so you've just created two looks for the price of one.  Go ahead, be even more impressed with yourself.


Week 17 Recipe: Potato Balls

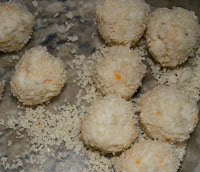
From time to time we all end up with leftovers and if you are like me you probably don't want to eat the same old reheated leftover.  This is a yummy way to "transform" your leftover mashed potatoes.


So yummy I didn't get a picture of them plated!

Ingredients:
1 cup cold mashed potatoes
1T sour cream
2T shredded cheddar cheese
1/2 cup panko bread crumbs
salt and pepper to taste


Instructions:
Heat your oven to 350 degrees
In a bowl combine potatoes, sour cream, cheese and salt and pepper
Using a  tablespoon measure scoop the potato mixture and form into a ball
Place the panko crumbs in a shallow container and roll the balls in the crumbs until coated

Place your potato balls on a foil lined baking sheet that has been sprayed with non-stick spray.


Bake for 10-12 minutes until the potatoes are golden brown.  Put a little bit of space between your potato balls because they do spread a bit (based on how thick your mashed potatoes are to begin with).

Serve with additional sour cream or ketchup.  Enjoy!


Wednesday, April 17, 2013

Week 16 Recipe: Orange Brownies


This week our neighborhood had a block party.  It was great catching up with old friends and meeting some of our newer neighbors.  Everyone pitched in and brought either a side dish or dessert.  The food was great, and I managed to wrangle a couple of new recipes to add to my repertoire.  

My contribution was a tried and true favorite - orange brownies.  This is a Paula Deen recipe that she got from a Pillsbury bake off finalist.  These brownies are off the chart delicious; if this recipe was just a finalist I can't imagine what won!

Tread carefully...this is from Paula Deen, so make sure your gym membership is paid up before you turn that oven on!


Ingredients
1 1/2 cups all-purpose flour
2 cups sugar
1 teaspoon salt
2 sticks of butter, softened
4 eggs
2 teaspoons pure orange extract
1 teaspoon grated orange zest
Glaze:
1 cup confectioners' sugar
2 tablespoons orange juice
1 teaspoon grated orange zest

Directions
Preheat oven to 350 degrees F.

Grease a 13 by 9 by 2-inch pan and set aside. In a mixing bowl, stir together flour, sugar, and salt. Add butter, eggs, orange extract, and orange zest and beat with a handheld electric mixer until well blended. Pour batter into prepared pan and bake for 30 minutes, or until light golden brown and set. Remove from oven and pierce top of entire cake with a fork.

Glaze:
Combine all ingredients in a bowl, stirring until smooth. Pour glaze over warm cake. Cool cake and cut into squares.


Week 16 Craft: Americana Table Runner

Can it be that we are only six weeks away from Memorial Day and the unofficial start of summer?  BBQ's, watermelon and lemonade - ahhh - I love it.  I like having some patriotic touches throughout the house, but didn't want to be overwhelmed with red, white and blue.  This was posted on Pinterest awhile ago, but is for a table runner that is no longer available.


Too cute!  But, because it's no longer for sale I thought I could try to come up with something similar.

Here's my copy cat version:

Instead of a gingham check I used striped pillow ticking.  I mean what's more Americana than pillow ticking?  The original appears to have embroidered stars; mine are stenciled on.  

Here's what you need to make your own:
2 yards of blue ticking (The stripes need to run the length of the runner, so buy the length  you want your runner to be.  Mine is 75" which is why I bought 2 yards.)
8"x14" piece of canvas
sewing machine and thread
Blue fabric paint
Freezer paper

Cut a piece of ticking the length of the fabric by 14" wide and 2 pieces of canvas 4"x14". 
Sew the canvas pieces onto each end of the ticking.  Because this isn't lined I recommend using a french seam.  

Don't know how to make a french seam?  Click here to see how.  

To make crisp corners I recommend mitering them.  Start by ironing the edges in 1/2".  At the corners open the pressed edges out and fold the corner in as shown below.

Trim off the point and fold the edges back in.

Tuck the raw edges under and stitch all the way around.


Now it's time to stencil your stars.  Don't know how to use freezer paper for a stencil?  
Here's the cliff notes version of freezer paper stencilling.  Using an exacto knife cut a star shape out of freezer paper.  With a cool iron press the paper to the canvas.  With a stencil brush and fabric paint fill in the star.  Remove the freezer paper.


Just like that you are done!  


Tuesday, April 9, 2013

Week 15 Craft: Spring Hose Wreath

Spring is in the air, the time of year when flowers bloom, birds hatch and if you live in Arizona you turn your air-conditioner on!  This wreath is sold by Plow & Hearth.

It is gorgeous!  It's also $49.95, and I thought I could probably come up with something similar for about half of that.  Here's my interpretation:

Here's what you need:
15' (or so) of hose
Silk flowers
Ribbon
Zip ties
Floral tape
Wire
Wire cutters
Scissors

1. I bought this hose at Target for $10.  It's 50', so I cut it down to size.  Good news...if you purchase extra "ends" you can get three wreaths out of the one hose.  I wanted the taupe hose and couldn't find it in a shorter length.  Here's a photo of the end piece - just work it into the end of the cut hose.

2. Wrap the hose around three times and adjust it to the size you want.  Mine ended up being about 19"
3. Add two zip ties about 6" apart to the top, but don't tighten them all the way.
4. Start adding your silk flowers, working them under the zip ties.  Use the wire cutters to adjust the stems to your desired length.  Use the floral tape if you need to combine the stems if you wish.

5. Once you are satisfied with the arrangement tighten the zip ties and trim the excess.  Note: don't trim too close to wear the zip tie feeds through or it will come apart.
6. Add your ribbon.  
7. Wrap your wire around the hose and make a loop to hang the wreath.


I was able to put this together for around $24.  Michael's had a big sale on their flowers and I lucked into the ribbon for 75% off.  That also left me enough hose, ribbon and accent flowers to make a second wreath.  My suggestion is turn this into a fun friend afternoon, split the cost and you each end up with a wreath for around $16!
The geraniums in the Plow & Hearth wreath are what I really wanted, but Michael's didn't have any.  I'm hitting up Hobby Lobby today to see if they have any.  Darn them for being closed on Sunday!!  Wait...can I go to hell for saying that?


Week 15 Recipe: Orange Jalapeno Shrimp

This week's recipe inspiration comes from the USA Weekend insert from Sunday's newspaper. Sorry, no original photo or link.

My hubby has been on a real shrimp kick lately, I on the other hand will not touch shrimp.  But, because I like to think of myself as a good wife I've been trying to find new shrimp recipes so he doesn't get bored (with the shrimp, not with me).  This recipe got a big thumbs up from my shrimp lover, so here it is:


Ingredients:
1lb Shrimp (peeled and deveined) 
1 jalapeno pepper chopped and seeded
2 cloves garlic minced
2T honey
Juice of 3 oranges (enough for 3/4 cup)
1t reduced sodium soy sauce
1T vegetable oil
Salt and pepper to taste
NOTE: the original recipe also calls for 8oz. of broccoli florets.  Broccoli is considered evil and has been banned from our household.

Instructions:
1. In a small saucepan combine orange juice, soy sauce and honey.  Bring to a boil and boil until sauce is reduced by half (about 8 minutes).  

2. Heat the oil in a large skillet over medium heat.  Add the jalapeno and garlic and cook for two minutes.
3. Season the shrimp with salt and pepper.  Add the shrimp to the skillet and cook until the shrimp starts to turn opaque.  Toss the shrimp so it cooks evenly.
4. Add the reduced sauce and cook for 3-4 minutes. 
5. If using evil broccoli remove the shrimp, add your broccoli to the pan, cook for 3-4 minutes and then add the shrimp before serving.

6. Serve over rice or noodles.


The review from the hubby is that it was very flavorful.  The honey really came through with a nice citrus undertone.  He tells me the jalapeno did not add too much heat.


Wednesday, April 3, 2013

Week 14 Craft: How to Install an Invisible Zipper

Invisible zippers.  They're invisible, so it must be because of some ancient evil magic, right?  Well, that's what I always thought.  It turns out the magic is in the sewing foot you use.  I've always been lead to believe that you can put in an invisible zipper by just using your machine's zipper foot...WRONG!  If you already know how to install invisible zippers than read no further, but if (like me) have been stymied by them read on.

My father has been on a mission lately to get rid of all the "stuff" cluttering their house and his way of doing this has largely been by offering it to my sister and I.  Last week the "stuff" I inherited came in the form of a beautiful crocheted bedspread that one of my great aunts made.  Well, when I say made, what I mean was she was working on it...and didn't complete it before she died (about 40 years ago).  Somehow it passed from relative to relative until it ended up with me.  My guess is that everyone had every intention of finishing this work of art, but never got around to it.  One look at the amount of work that still needed to be done and the size of the teeny tiny crochet hook and I think everyone gave up.  Heck, for all I know it's what killed my great aunt!

It's beautiful, isn't it?  And that's why I couldn't just throw away this partially crocheted bedspread from 1948.  Long story short, I decided to make it into pillows.  Which is why I am doing this tutorial on invisible zippers.  Whew!  I knew the dots would eventually connect.

So here's what you need for a 15" pillow:
2 squares of fabric 16"x16"
1 14" invisible zipper
1 invisible zipper foot
1 16" pillow form
Sewing machine and thread

You can purchase an invisible zipper foot for as little as $5.99; no more excuses for not having one.  Below are a couple of photos that show you what they look like.  Word of caution: when you start to sew make sure your needle is set to go through the small hole!

This pillow uses a 1/2" seam allowance.  This makes life easy because you just line the edge of the zipper tape with the edge of the fabric.  If you are using a 5/8" seam allowance it makes life much easier if you run a row of basting 5/8" in from the edge of your fabric so you have a "marker" to easily line your zipper up with.  

Unzip the zipper.  You will notice the teeth roll in slightly.  With your iron set on synthetic iron this roll flat.  Place the top selvage of the zipper tape 1" from the corner an pin the right side of the zipper to the right side of your fabric.
I think a picture will be more helpful than a description.  The zipper coil is the rounded piece you see in the "right" channel of the zipper foot.  Sew in place.    

Sew as far as you can without running into the zipper pull.  Repeat for the other side. 


  Pull the zipper closed and place your two pieces of fabric right sides together.  Switch to your machine's regular zipper foot.  Sew the section from the corner to top stop on the zipper.  Pull bottom of the zipper away from the fabric and sew the bottom section starting where your previous stitching stopped and ending at the corner.


Zipper being pulled away from fabric

 Congratulate yourself; you have just completed an invisible zipper!


Open the zipper about 6" (so you can get your hand back through to turn the pillow) and sew the other three sides of the pillow together.  Clip the corners and turn right side out.

Insert your pillow form.  Hint: your pillow will appear fuller if you make your pillow cover an inch or so smaller than your pillow form.

I carefully cut a section of the bedspread and hand stitched it to the pillow.


Voila!  Gotta go; I have three more pillows to make for my sisters and sister in law.


Week 14 Recipe: Zinged up Chicken Salad

This week's recipe starts with a shout out to Better Homes and Gardens. You can get a a 12 month subscription to their magazine for ONLY $5.99 and...AND they send a daily inspiration email with amazing recipe, gardening and craft ideas. If you don't already subscribe here's a link.  No, I don't work for them or get paid to promote the magazine; I just think it's one of the all time great bargains.

Back to the blog...today's BHG daily inspiration included adding punch to your lunch.  I'm pretty sure everyone would agree that if you pack a lunch day in and day out it can get pretty boring.  One of BHG's suggestions is adding fresh herbs and lemon zest to chicken salad.  Sounded good to me, so I tried it on my chicken salad recipe.  YUM!


Ingredients:
4 oz. chicken breast
2T chopped celery
2T chopped apple (your favorite kind)
4-5 seedless grapes sliced (red or green)
2T light mayonnaise 
1/8t lemon zest
salt to taste
7-10 cilantro leaves
English cucumber sliced thin
Ciabatta roll

1. Combine the first seven ingredients in a bowl and mix well.  I used canned chicken breast - don't judge me.  Yes, I'm sure roasted breast would be better, maybe next time.


2. Slice the ciabatta roll and cover the bottom bun with the sliced cucumber.  
3. Heap the chicken salad on top of the cucumber.  Heaping makes it sound so much more substantial, doesn't it?
4. Place the cilantro leaves on top of the chicken salad.
5. Cover with the top bun, slice and enjoy.


I couldn't believe how much that teeny bit of lemon zest brightened up the sandwich!  You don't really taste the lemon, it just tastes better.  The fresh cilantro also made the sandwich taste better without adding an overwhelming cilantro flavor.  My ciabatta roll was onion poppy seed and that added more dimension too; this whole sandwich was a flavor explosion.

Don't like cilantro?  Try adding parsley, dill or basil.  Don't like cucumber?  Just use lettuce.  Give it a try.  My tuna salad better watch out, because I'm going to give that a makeover too!